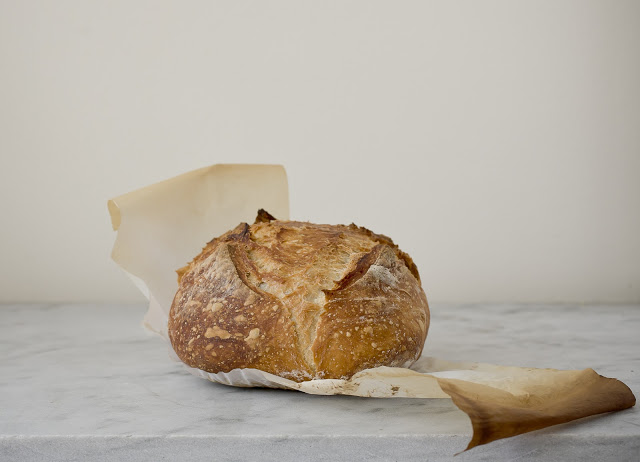
Outside the world is coated in snow, but I’ve been living in a flour dusted apartment for over a week now- and I think you’ll be glad that I did. What fun I have had making this ridiculously easy and wildly famous No Knead Bread.
The recipe made its debut in 2006 in Mark Bittman’s, The Minimalist column in the NY Times. I tore out the recipe from that printing, and it kicked around my office for years. From time to time I would look at it and think that I should give it a try, but never did. When I moved last year it got lost in the shuffle, but I never forgot the idea.
It has been a long standing tradition of mine to bake bread in the early part of the year. It’s hard to explain why, but it’s somewhere in the “monarch butterfly migration” part of my brain. Without thought or plan, I find myself reaching for yeast every January and February. There is no explaining it, it just seems to happen.
Over the years I’ve done quite a bit of perfecting and experimenting of different methods and recipes. My favorite method has always been to make a poolish first, which makes a gorgeous, chewy bread with a crispy crust. My only complaint is it’s a long project that requires a lot of tending. A great thing for a snow bound weekend, such as this one, but for practical reasons it’s tough to make as a regular habit. For some reason, the latent memory of this recipe came back to mind last week, and I went on a search for it. Happily it was not hard to find.
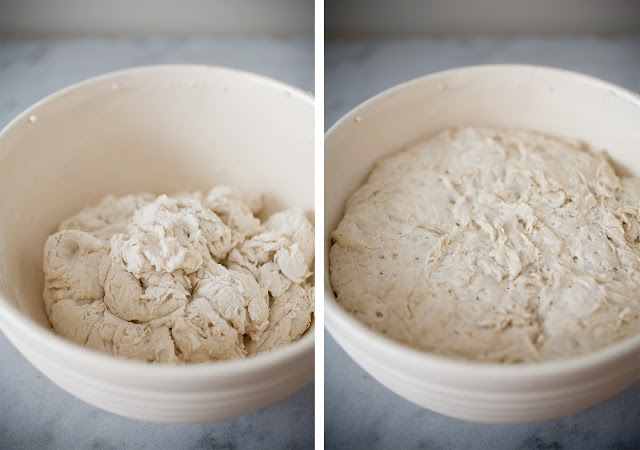
The only similarity between the two methods is that no knead recipe takes as many hours on the clock, but with so little hands on involvement, it’s almost comical. To make this bread all it takes is measuring out the ingredients, mixing them with a SPOON, letting the mess rest for 12-24 hours, shaping it, and baking it! The result is a bread that is so gorgeous and delicious which, after I stop laughing in delight, I found myself sniggering while looking the window of an artisanal bread bakery yesterday. “Pfft!”, I thought, “I can do that!” Shame on me for sure, but it’s hard not to get a little cocky!
This recipe is the brainchild of Jim Lahey, of Sullivan Street Bakery, who devised the recipe as a minimalist technique to bread baking, that anyone could make. The magic to this beauty is in the science. The recipe uses very little yeast, and the water content is very high. Another big difference is that the proofing time is extremely long and slow. Apparently the wetness of the dough, and the long rising time, allows the gluten molecules to align themselves into long strands, creating elasticity, thus eliminating the necessity to do laborious kneading to develop those strands. The high moisture content also creates a beautiful crackly, crust by providing steam from its own moisture during the baking process.
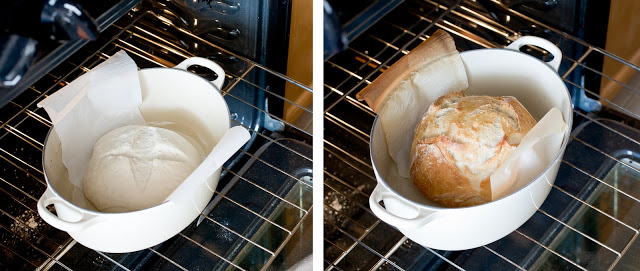
The other difference is the bread is baked in a preheated enamel pot within the oven, which creates an environment for the steam to circulate within, developing that crunchy crust. In professional bakeries they manage this step with built in steam jets, or some people have been known to spray the bread during the baking with water, (raising hand), which is a bit scary as the steam kicks back in your face, while quite a bit of heat dumps out of the oven and into the kitchen. I’ve never been a fan.
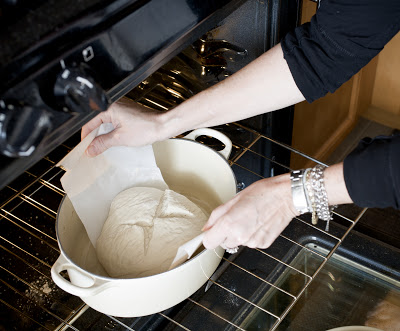
The pot I used is a 5 Quart oval Le Creuset Dutch Oven, like this one, which I highly recommend. The oval shape allows you to get your hands into the pot on the long ends of the oval when you drop the dough in. I’ve read of other folks that have used cast iron pots, and even glass casseroles, which apparently work fine. If you have a round pot and get antsy about slipping the dough into the raging hot pot, you can use some parchment paper, which functions as a handle when dropping into the pot (as I have demonstrated in the photo below). This step can save you some anxiety, and make moving the dough easier.
You can find the original recipe HERE, but I’ve made a few other tweaks that I will share with you.
Most everything remains the same with two notable exceptions. First off, I don’t use cornmeal on my board when I turn the dough out. I found that a reasonable dusting of flour is just fine. I’ve been making so much bread lately that I now have a pastry cloth that is dedicated to bread making. The cloth is saturated with flour so it is forever stick free. It does not need to be washed. I simply give it a good shake into the sink, and then store it in a plastic bag when not in use.
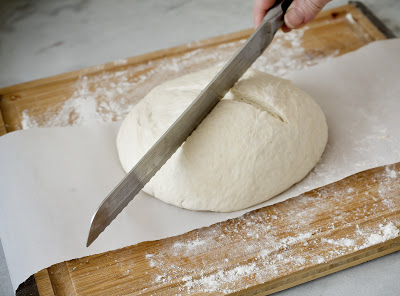
The second tweak, as I mentioned, is I have taken to making cuts in the top of my bread, which assists the rise and I think looks nice. Without the cuts I find that the bread will get great cracks, a beautiful rustic look that you might enjoy. Making the cuts assist in the “baking bump” or the rise during the baking, which also makes a rounder loaf. Without that lift, I found my dough a bit too dense and wet for my taste. A longer baking time will eliminate some of that wetness if you prefer to not make the cuts (another 10-15 mins).
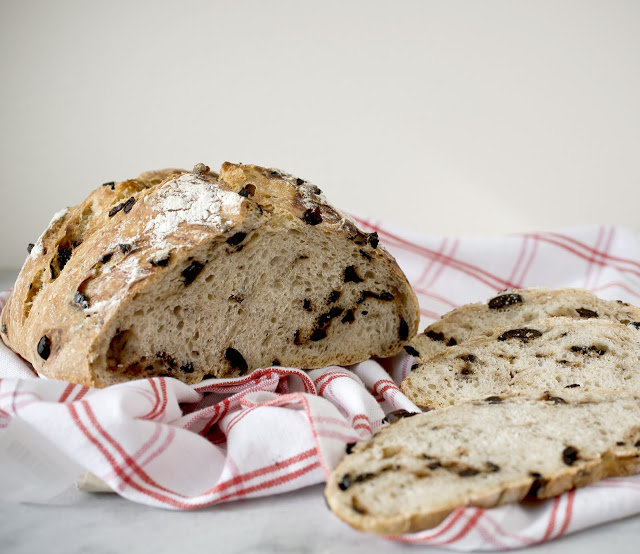
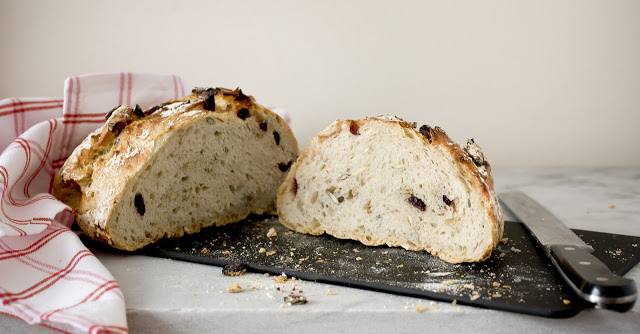
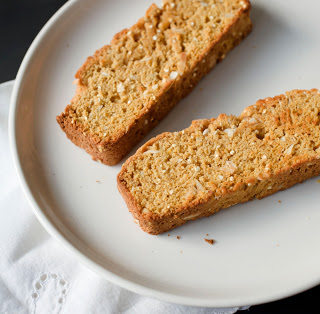
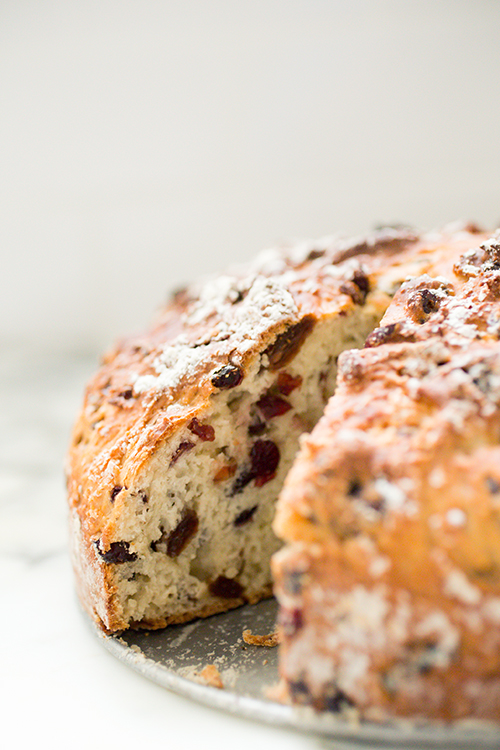
I made quite a few loaves this week, testing and retesting my changes. Very early on, after making just two plain loaves, I decided to throw in a few things for fun. The bread above had a generous handful of chopped black olives and rosemary. The bread below had dried cranberries and pepitas tossed into it. Both turned out beautifully, which opens the door for many other possibilities. I invite you to experiment with your own. I simply added the extras during the last strokes of mixing the dough. Simple as that.
This is one recipe that I really hope that you try. That is, if you’re not already a convert.
I would really LOVE to see what you have done with this recipe. Please comment and post a link to your bread- and please share any insights you may have. I am really interested to hear, and see, what you have done.


 Kathy Shea Mormino says
February 11, 2013 at 2:48 pmThis comment has been removed by a blog administrator.
 littlekitchie says
February 11, 2013 at 3:39 pmWow, your bread is GORGEOUS. I’m going to have to try this out soon!
 Rachel Ring says
February 11, 2013 at 11:42 pmI’ve made this before, and agree that it is almost silly how easy it is… I try not to make it too often or I won’t fit into a wedding dress in a few months!!! DELICIOUS; I think I’ll make a loaf for Valentines Day though 🙂
 Phil Holtberg says
February 15, 2013 at 6:07 pmI love good bread and this looks amazing. I’m not good at baking but maybe I can try this one.
 Gail Watson says
February 15, 2013 at 11:05 pm@Rachel- thanks for sharing. I happen to think fresh baked bread for Vday is a GREAT thing! Congrats on your upcoming nuptials!
 Gail Watson says
February 15, 2013 at 11:06 pm@Phil- oh give it a shot- you’ll love it!
 Greig says
April 15, 2013 at 3:21 pmthanks for the great recipes
 Gail Watson says
April 15, 2013 at 5:52 pmAren’t you sweet Greig- Thank you!
 Lindsay says
August 8, 2013 at 4:30 pmWow, this bread turned out so good! I baked it yesterday, and the only problem is that it was so good we ate it all that in one night!! Although, its not really a problem since it is so easy to make so I just whipped up another loaf to bake tonight! I think rosemary will go very well in this bread so I put a few pinches in this next batch.
Also – I don’t have a dutch oven so I used a 6qt cast iron pot and it worked perfectly.
Thanks for the great recipe!
 Gail Watson says
August 9, 2013 at 6:42 pmFantastic! Isn’t it wonderful?? Gold star for falling back on the cast iron pot- glad it worked out for you. Welcome to the club!
 clee says
August 12, 2013 at 1:54 pmi’m excited to try this tonight, to bake for tomorrow’s dinner.
when the dough is in the pot, is the seam side (from folding the dough) facing up or down?
or, would that even matter since we will be cutting the cross on top?
 Gail Watson says
August 17, 2013 at 11:21 amSorry for my delayed response, we just got back from our honeymoon (!)- You would want to put the seam side down for a prettier bread and a more even rise.
That said, this is a rustic bread and there would be no demerits for uneven appearance. Let me know how it turned out!
Gail
 clee says
August 18, 2013 at 5:35 pmHope you had a happy honeymoon!
I baked the bread seam-side up. Still looked pretty and tasted delicious!
I had a hard time cutting the cross on top because of the sticky gooey dough. I found that using a pair of wet kitchen shears worked really well.
 Gail Watson says
August 20, 2013 at 1:26 pmFantastic! I”m glad it turned out well!
 Dana Gusek Marquardt says
August 17, 2013 at 10:35 amBeautiful bread, I’ve put it together last night and when I opened the lid this morning to take a peek, it smelled quite sour. Is this normal?
 Gail Watson says
August 17, 2013 at 11:19 amHi Dana- That can be normal, depending on what that “sour” smell is really like. The dough should have a yeasty smell and even a tang- but if it smells like dank basement, or wet paper-y- than that’s not desirable. I would toss it and try again. The reason for this may be that your environment is too warm and it was left for too long. It may also mean that your yeast is not active and so the dough simply went south.
If however your dough is tangy and yeasty and rose nicely, then you are more than fine! It will make a fine bread.
Thanks for taking the time to ask- and let me know how it turned out! Gail
 Dana Gusek Marquardt says
August 18, 2013 at 12:34 pmHi Gail,
Just wanted to let you know that the bread was a success! That loaf is already finished and another is being baked today. The sour smell was indeed tangy and I’m sure it was just strong because I stuck my nose in after it had been sealed for 12 hours. When I checked a few hours later it had the unmistakable yeasty smell. Thanks for your help! And thanks for this wonderful post! Dana
 Deborrah says
September 12, 2013 at 7:58 amI heard about No-Knead Bread from a friend last evening. I got home, did a google search and found your post. It looked so easy, I whipped up the dough right away. It has now been eight hours and I have a few more to go before the baking step. I am wondering what to do for my pot, since I don’t have one like you describe. Does it have to be really heavy, or would a regular turkey roaster work?
Deborrah
 Gail Watson says
September 12, 2013 at 8:14 amDeborrah- So glad you decided to give this a try. I know you’re going to love it. Good question about the pot. I’ve heard of others who have used other than the cast iron pot and their bread worked out fine. The concept is you want an enclosed environment for the bread to steam which then creates the beautiful crust.
Just be sure your pot is well preheated, and also be sure that there aren’t any knobs that might melt since the baking temperature is higher than one would typically roast a turkey.
Good luck! and please let me know how it turned out!
Gail
 Tina says
December 5, 2013 at 2:23 pmHi,
Is it okay to let this sit past 24 hours? I won’t have a chance to bake it before 26 hours. Thanks!
 Gail Watson says
December 5, 2013 at 6:16 pmIf you want to hold this for so long it would be best to put it in the fridge to slow down the rise. If you leave it too long you will exhaust the yeast and might also start fermenting, or souring, the dough. The result would be a flat bread. I hope this helps. Gail
 Tina says
December 5, 2013 at 8:47 pmOkay, great. Thank you!!
 Tina says
December 5, 2013 at 9:55 pmHi again Gail,
I baked this tonight, and while the flavor is fabulous and the top and side crust is deliciously thin and crackly, the bottom crust is as hard as a rock. Do you think I used too much flour when forming the dough into a ball?
 Gail Watson says
December 6, 2013 at 10:37 amHi Tina- This is a good question, it could be a couple of things. The first thing that comes to mind is you might have it too low in your oven. This would cause the bottom to cook faster and be denser. Does that seem like it? You may also have baked it too long overall. Every oven is different, so when possible, test your oven temp. To do this preheat your oven for 20 minutes with a oven thermometer and then take a reading. It’s not uncommon for an oven to get out of calibration. If it’s over, simply adjust your dial to compensate and see if that helps before calling repair.
I hope that helps, let me know how it goes. Gail
 Nellie Lytvinenko says
December 19, 2013 at 10:49 pmThanks so much for your post! I’ve made this bread in the past but couldn’t find the recipe. It is outstanding and I’m looking forward to baking in the next couple of days for Christmas.
 Gerry says
December 29, 2013 at 11:06 amI noticed on the recipe on the NYT page, it calls for 1 5/8 cups of water, yours is 1 1/2 cups. I like yours Much better! I can actually handle the dough with a bit of flour on my board and hands. But I do have a question or 2. First off, at what point do you add the extras ? (olives, herbs, etc). Secondly, should I measure out my flour on a scale or scoop and level off with a knife? I am trying to keep everything weighed for consistency in my baking, but wondered what method you used? Scooping or spooning gives such radical differences every time in terms of the amounts you are putting in. If I scoop or spoon out the flour can I add more water to make it wetter?
Thanks!
 Gail Watson says
December 29, 2013 at 12:26 pmThanks for your questions Gerry, they are very good ones. Flour and weight is an ongoing discussion amongst serious bakers, especially when it comes to pastry. For this bread I don’t weigh, I just dip and sweep to measure. BUT! Let me add this caveat: Flour is hydrophilic, meaning that it attracts water, and if you are living in a humid environment (or store your flour in one) you may need to make adjustments. Here is my sage advice on the subject. Learn your kitchen. That goes for your oven etc. Contrary to popular belief, recipes are not scientific formulas, they are specific guidelines, but guidelines nonetheless. I tested and retested this recipe in MY kitchen and with my style and equipment, and it works beautifully for me EVERY TIME.
But let me say that being careful particular in baking is a VERY good thing. You can’t go wrong with paying close attention. So kudos to you!
As for adding the extras, I added mine right at the start. If you are adding something that might weep color, you may add the extras after the rise by kneading them in, but you would then want to let that batch rise again for a few hours. It won’t take as long as twelve, but since I’ve not done it, I can’t say exactly. Rough guess: 4 hours. {if you do it, please let me know}.
Thanks again for your questions. Please PLEASE let me know how it goes. Gail
 Gerry says
December 29, 2013 at 12:32 pmThank you so much for your time! I am starting another batch today and will bake off tomorrow. I think I will use some fresh rosemary and a garlic clove or two. Topped off with some flakey cypress salt. 🙂
 Jeanarie says
January 3, 2014 at 12:16 pmI am excited about making this bread.. My problem is I have pyrex deep bowls but no lids, I have a hugh cast iron pot with a lid but it had a wooden handle on top.. When at walmart, looking for a casserole dish with lid, I found none, I found deep crocks with no lids, in fact I found a lot of things with no lids. Now I looked up the dutch oven you use and from the looks of the photo’s they have plastic handles on top… What do I do??? Can foil work?
 Gail Watson says
January 3, 2014 at 9:07 pmMost of the Dutch ovens, even if they have plastic knobs, are meant for roasting at high heat. Foil would not really work, it doesn’t insulate well enough. You want an enclosed environment that can trap the steam and retain the heat. At the very least I would place a larger flat pan lid on top of a container that was heat proof. You might be able to find a pot at a thrift store or yard sale. You might also ask a neighbor. It seems that many folks have a dutch oven in the back of their cabinets that they rarely use. Anyway, good luck and please let me know how it goes! Gail
 vicky says
January 3, 2014 at 1:32 pmWHAT IS .25 YEAST NEVER HEARD OF THAT WHEN YOU TELL ME GONNA MAKE THIS I LOVE MAKING BREADS THANK YOU VICKY
 Gail Watson says
January 3, 2014 at 9:02 pmHi Vicky- it’s a 1/4 teaspoon of yeast. Sorry for the confusion!
 Davd says
January 4, 2014 at 11:06 amHello,
Thanks for sharing, it looks great.
My dough is done and now resting, but I wanted to know if anyone has ever tried this in a clay pot (I have a German Schlemmertopt). My theory is it should work the same, but wanted to know if anyone has ever tried?
Best regards,
David from finland.
 Gail Watson says
January 4, 2014 at 11:53 amHi David- I’m not sure what a Schelemmertopt is. Assuming that there is enough room in the pot for the rise, I think it would work fine. If you try it, please let me know how it went.
 Liz says
July 8, 2016 at 6:16 pmI have used a clay pot my husband found at a job site. Someone was using it as a planter. It works very well. Must heat pot and lid on oven while preheating. When I use cast iron it doesn’t talk much time after removing the lid. The clay takes a bit more, more like the recipe. I like the clay because it makes more of a loaf shape.
Also, thanks for this recipe it is a dream.
 Bonnie says
January 8, 2014 at 12:10 pmYummy! I baked this bread in a cast iron Dutch oven. I did take the lid off for the last 15 minutes, but it had already become golden brown on the surface with the lid on. Next time I will leave the lid on for the entire time. I will use this recipe over and over. So beautiful! I am off to buy more flour!
 Gail Watson says
January 8, 2014 at 1:22 pmFantastic! Welcome to the club Bonnie!! Thanks for sharing. {warning: it IS addicting!}
 Morley Lertzman says
February 2, 2014 at 8:43 pmI have made this bread repeatedly with great success. My most recent variation is the addition of 1/2 cup of chopped fresh dill and 3-4 cloves of chopped garlic which is added to the other components and mixed in, or kneaded into the dough before baking. This has been quite delicious
 Jean says
February 14, 2014 at 10:04 amI didn’t really believe it would be as easy as you said — but with two days of snow on my hands, I made the dough yesterday, let it rise overnight and put it in the oven this morning. I just took the lid off (for the last 15 minutes of baking) and it is so beautiful. Can’t wait to dig in for breakfast with some of my favorite American Spoon preserves. Thank you!
 Gail Watson says
February 17, 2014 at 2:38 pmFantastic Jean! Now don’t you feel like a pro?? Congratulations on your first bread. I wish you many many more!
 Lillian says
March 1, 2014 at 11:02 amI have baked this bread with great taste success, but for some reason the shape always falls.. I don’t get that beautiful round shape when shaping the dough, and making the cross in the top is impossible as the dough is so floppy.. what am I doing wrong?
 Gail Watson says
March 1, 2014 at 2:36 pmI’m glad you reached out Lillian. It’s possible that you are using just a little too much water. Conditions vary, so it’s not that you’re doing anything wrong, it’s just something you might need to tweak. If you go back to the post and look at the consistency of my dough it might help guide you. I would try reducing your water by a 1/4 cup and see how that works for you. Making these types of adjustments is something that all bakers do, especially when it comes to making bread. Please let me know how it goes, and if you’re still having a problem please reach out to me again, I would love to help you through this.
 booch221 says
March 10, 2014 at 12:46 amI started with this recipe, and made a few changes. I use 4.5 ounces of all purpose flour, 7 ounces of bread flour, and two ounces of semolina. I cut back the water to 10 oz. I mix it together and let it stand overnight, 12-18 hours.
I place my dough on parchment paper and then bake it in a 12-inch cast iron skillet. I preheat the oven with a pizza stone in it for 30 minutes at 450 F. I don’t preheat the skillet. I put the dough and parchment paper into the cold skillet, put a metal lid on, and place it on the pizza stone, for 30 minutes. Then I take the lid off and bake it for another 10 minutes. My loaves come out looking like a ciabatta. Right before you put it in the oven you can dust the top of dough with flour, for that artisan look.
 Gail Watson says
March 10, 2014 at 7:06 amThank you so much for this! I love it. Very nice touch using a hot pizza stone and avoiding having to handle the hot Dutch oven. I would love to see a photo of your bread sometime. You can send pics to gail@astackofdishes.com Thanks again!!
 karen says
April 14, 2014 at 10:08 amI’m super excited to try your recipe. One difference I noticed between your and the original recipe is that the original NYT recipe allows for a second 2 hour rise after the shaping. Would love your thoughts on what effect the second rise does, or omitting it as in your recipe, have on the bread?
 Gail Watson says
April 14, 2014 at 2:09 pmThis is a great question, thank you for asking Karen. As it says in my post, I tried many variations of this recipe. I found the 2 hr second rise to be unnecessary. Without that rise my dough yielded a bread that was light and airy but with enough structure to use for sandwiches etc- as you can see in the photos.
My advice is to give it a try for yourself. Make two batches, bake one off early and let the second rise and see what you get. The beauty of cooking is working the recipe to suit your tastes and kitchen styles.
Please let me know how it goes!!
Gail
 Guy says
May 5, 2014 at 6:04 pmI have made this bread for about the last 5 years every two days… in that time baked thousands of loaves. Changing it almost everytime… and repeating the recipe to test outcomes, altering temperatures and the time at which the bread enters the oven in the temperature cycle, indredients and adding tricks… which I will explain shortly.
Here are the results.
I have found that the best way to get the beat baked loaf of bread depends on what you call the bread you like. For me the original bread recipe makes great bread but the crust is just too tough and “bomb proof” bread is a serious workout for your jaw. Many times the bread knife had to act like a saw just to get through the base. Thats too tough. So I modified and modified… the result for me came by using a very old French bread trick and also timing when to add the bread to the oven is critical. This is what I do for a soft crust thats not going to break your teeth… but is nicely firm and still has a bit of a crunch to it.
When the resting dough is still in your container from the overnight…
(1) I use 2 cups of water instead of 1 1/2 cups. And I add flour after I have used 3 cups of flour just until the dough is able to be worked a bit without being a sticky mess.
I use 1 cup of Rye Flour, and 2 cups of Wheat Flour – this makes amazingly good bread… not too airey and not too “concretey” – if thats a word.
(2) Set the oven to 200Deg Celcius on fan bake or thermowave… whatever your oven calls it… they all use something different.
(3) Then remove the dough by adding pinches of flour to the sides and peeling it off as it will have stuck to them. The flour seals the wet dough of course. You don’t want to compress it too much as you are removing the air from it. The dough has only risen once by now, normal bread rises and you kneed the air out and it rises again. We are not doing that.
(4) I cut baking paper into a square and slice 1 cut into each side of the paper… then put the dough in the middle of it and lower it into the pot – cold ! The paper folds around the cuts and it fits nicely. I then drizzle milk over the dough… this makes it brown perfectly. The lid goes on and into the warming over it goes.
(5) 55 mins later … I get a baking tin thats about the size of the pot the bread is in… I half fill it with cold water and open the open, remove the pot lid and put the baking tin with water in the oven on the tray underneath the baking bread. Close the oven.
(6) You now have a steam oven… this softens the crust to perfection and you are about 10 – 15mins away from the result. You want to check on it without opening the door if possible… I have done this so many times now I don’t need to as I know my ovens temperature is perfect for the time.
(7) Open the door, remove the baked bread and put it on a baking cooling rack on the bench, but importantly leaving it in the pot. This allows it to cool slowly as the pot cools and keeps the crust perfect and the heat allows any more moisture in the bread to cook off slowly.
I do not cut a slot or cross in it… I tried that a number of times and found all it did was give me odd shaped bread and effectively waste bread. With me adding a bit of flour at the start – I estimate about 1/4-1/2 a cup this means a slightly larger loaf but its perfect for my baking pot and comes out having filled it up nicely… a nice square topped loaf with a round side shape. I also add 2-3 handfulls of raisins as this is not fully savory bread they work perfectly.
 Mrs C says
August 8, 2014 at 8:52 amFetta cheese and rosemary and garlic. Yumm With a nice hot bowl of pumpkin soup. Mmmmmmm bliss.
When turning it out try sprinkling each fold with brown sugar and 5 spice for sweet bread. The possibilities are endless.
 Sarah says
September 4, 2014 at 6:03 pmCan I use regular yeast? I don’t have instant.
 Gail Watson says
September 20, 2014 at 2:44 pmAbsolutely yes!
 Carol T. says
October 12, 2014 at 4:18 pmI made this loaf yesterday with jalapeno/garlic stuffed green olives and grated parmesan. There is one tiny slice left, so I have another batch prepping for tonight — honey, curry powder, and chopped almonds. Looking forward to trying any number of mixtures, as this bread is a favorite in our home. Thank you.
 Carol T. says
October 12, 2014 at 4:21 pmI’d like to find a way to successfully incorporate pumpkin into the mix — perhaps with some pecans. Extra flour to compensate?
 Gail Watson says
October 14, 2014 at 12:40 pmCarol-I love your combinations! I’m not sure about the pumpkin. It might interfere with the yeast by making the dough too heavy and wet. But hey- give it a try and let me know how it turns out!
 Craig says
October 22, 2014 at 9:44 pmThis recipe is superb. Here is a favorite variation I came up with – use half whole wheat, half all purpose flower – add a cup of toasted walnuts and a cup of currants and 1-2 tbsp cinnamon to the dry ingredients prior to adding the water. That’s it – you end up with a crusty, fragrant bread that is incredible toasted for breakfast, spread with a bit of butter and honey. We are about to try it for French Toast as well!
 Gail Watson says
October 24, 2014 at 1:06 pmCraig I love this combination! Thank you so much for sharing!
 Craig says
October 24, 2014 at 9:22 pmMy next challenge is to come up with a dark Russian rye type of combo – any thoughts? I know that some rye flower and caraway seeds are essential – I’ve also seen such ingredients as molasses, brown sugar, cocoa or coffee. I guess I will dive in and see what I can come up with. If you try my raisin cinnamon walnut combo, let me know what you think!
 Gail Watson says
October 25, 2014 at 4:17 pmThe pumpernickel idea sounds interesting too! I always thought it was molasses that made the dark bread myself. My ex was Russian and the bread he grew up on was dense and sourdough. I would love to hear how your experiments turn out.
 Glynis says
November 4, 2014 at 12:37 pmHi! Looking forward to trying this recipe out, but I was wondering if you knew how it would do with a heritage grain like Red Fife? I don’t have a lot of experience with breads, but I’d love to try an older wheat breed for this.
 Gail Watson says
November 4, 2014 at 2:46 pmHi Glynis- I don’t know much about Red Fife, except that it is another type of wheat. Your outcome would depend on the quality and quantity of the gluten in the flour. I don’t see why it wouldn’t work just fine. The better question is, where did you find it? Are you in Canada? Please give it a try and let me know how it turns out, I would be really interested to know. One word of advice: After you mix in the water, check to see that the consistency is similar to mine shown on the blog. Other wise adjust with more water or flour. Good luck! and thanks for asking this, I am extremely intrigued.
 Glynis says
November 6, 2014 at 8:14 amThanks for your response Gail! I am in Toronto, Canada, and Red Fife is pretty popular here! I’ve known a few restaurants to make their pre-dinner bread with red fife, and there are several brands of baking supplies that offer a packaged red fife flour. Also, Bulk Barn, a big chain here in Canada that has a decent amount of natural food options in bulk, has red fife flour in bulk too! I’ll try it out next time I get to one of their stores and let you know how it goes.
 Vicky says
December 1, 2014 at 6:02 pmI had this bread on Thanksgiving – a friend brought it to my sister’s with the dutch ovens and all. It was beautiful to look at, but the texture and flavor could have been better. I have made bread since I was a kid, over 40 years ago, and one rule of yeast bread is not to let it rise for too long, like never over an hour and a half, or the size of the bubbles will be too big, the taste too yeasty. This is science. Not the science that is mentioned in this recipe, that let’s us have beautiful bread with no kneading. It took me some time to learn this as a young girl who loved to bake, but I eventually did read that the reason my bread didn’t “taste” as good as it looked when I left my parents’ house to be with friends while my bread was rising for hours, maybe 4 or 5, was that a good tasting loaf depended on never letting the dough rise long enough, over 1 to 2 hours, so that the bread became yeasty. I’m going to give this recipe a try and let it only rise for 2 hours at a time, “punching” it down, which is a part of almost every bread recipe that I’ve ever seen, and I’ve seen and made many. I think the actual flavor of the bread will be much improved. I think most experienced bread bakers would agree with me. But if looks is what you want, this recipe produces a really pretty loaf.
 Gail Watson says
December 1, 2014 at 6:15 pmThank you for your comment Vicky- you’re points are well taken, but under these conditions not accurate. First off, the recipe here calls for 1/8th (about) the amount of yeast. The long rise time allows for the yeast to do it’s magic and build long strands of gluten, giving the bread it’s chewy texture, rather than a dense loaf. I am not sure why your friend’s bread was so different, but I can say that when it comes to making bread the devil is most definitely in the details.
All this said- the bread of your youth, and the bread of many others, with less water and more yeast, is a bread that is in a class of it’s own. I would not compare the two.
This recipe is tried and true. I’ve made countless loaves, not all of them have turned out alike- but if I were to bake every day I would do so. When I was a professional cake baker I could tweak the batters by “feel” each time based on moisture in the eggs, and the humidity in the room, etc etc. I “knew” how to get a consistent result. But for an untrained baker, this bread is wonderful, and has it’s place- just not every place or to everyone’s taste.
I love that you are thinking about this and again, I really appreciate you sharing with me. PLEASE let me know how your next batches turn out. I love this conversation!
 Judy says
January 27, 2015 at 1:02 amAs you say to Vicky, what makes bread taste “yeasty”is too much yeast. The more yeast you use, the quicker the dough will rise and if you leave it too long, it won’t taste nice. I haven’t yet tried this recipe, but have been using similar methods, except I put in in the fridge overnight after letting it rise at room temperature for a couple of hours – it is a variation of the Ken Forkish stretch and fold method. He, too, uses a dutch oven to bake the bread in.
I started off baking bread the way Vicky does, and only discovered accidentally that retarding the rise allows the flavours to develop and hence the bread tastes a lot better. I once started making bread the old fashioned way (kneed, punch down, etc), then got called out, so had no choice but to put it in the fridge. It was the best bread I ever made to that point.
Since then, having read lots of books, I have reduced the yeast and increased the hydration, and my breads taste beautiful.
I will try this recipe, because although the bread I make is quite easy, this sounds even easier.
Incidentally, if the knob of your DO is plastic and melts, you can easily replace it with a cheap metal “door knob” from the hardware store.
Also, I have discovered that wetting or oiling the implement you slash your bread with, makes the job a lot easier
 Gail Watson says
March 6, 2015 at 1:53 pmThank you so much for these insights. I am also a fan of the slow/fridge rise. I agree that the taste and texture is wonderful. Just another approach. And thanks for the tip about replacing the knob. Cheers!
 Karen says
January 18, 2015 at 7:42 amI’ve made this bread a few times. The first time I made it, I followed the NY Times recipe and made a plain white loaf with a dash of oregano. However, ever since then, I make a chili cheese loaf – adding in a teaspoon of dried chili pepper flakes and about a cup to a cup and a half of mixed shredded cheese. Delicious and a lovely bit of heat. Perfect with a cup of soup or a big bowl of steaming chili on Superbowl (or Grey Cup for us Canadians) Sunday!
 Gail Watson says
January 21, 2015 at 6:15 pmFantastic! I love it! Stay warm up there 🙂
 Laurie says
January 27, 2015 at 7:20 pmHi. Planning to try this recipe. I don’t have a 5-qt enameled Dutch oven, but I have two 3-qt
enameled Dutch ovens. They will fit into my oven. Can I divide the dough in half and use the 2 smaller Dutch evens? Would you suggest any changes to the baking time? Thanks!
 Gail Watson says
March 6, 2015 at 1:56 pmMy deep apologies for the delay in response. I’ve been traveling for the last 3 weeks and just catching up. Yes, you may use smaller amounts in different size dutch ovens, or reduce the ratio of ingredients in the first place. I would still check the bread after the initial bake and then remove it when it’s golden and crusty. Thanks for the question, I’m sure there are others who wonder this themselves. Best to you!
 clive says
March 5, 2015 at 2:05 pmCouldn’t find my copy of the NYT artisan recipe and found this courtesy of Google.
Followed the recipe using 1 cup of whole wheat flour and 2 cups unbleached. Looks wonderful and looking forward to slicing it for dinner. Thanks.
 Gail Watson says
March 6, 2015 at 1:50 pmThanks Clive! I hope you enjoy it!
 KarenS says
March 22, 2015 at 7:18 pmHi Gail,
A friend just passed this to my with her assurance that it was delicious and fool proof. I don’t have a great track record with yeast breads, but with that endorsement was excited to give it a go. The result is rather underwhelming: it didn’t really hold a shape even after sitting 18 hrs and came out of the oven pretty flat. I’m wondering if the culprit could be the yeast. I used Red Star active dry yeast. It doesn’t say “instant” and I notice both the NYTimes recipe and yours specify “instant.” Could that be the problem? I want to try again with less water but only if I can be confident about my yeast. Thanks!
 Gail Watson says
March 23, 2015 at 3:34 pmHi Karen- I’m glad you reached out! The yeast does not need to be instant, but it does need to be active. Did you get any rise/bubbling after the 18 hour wait? Yeast is a living thing and it must still be “alive”. Check on the date. You can also “proof” your yeast by putting it in the water (warm it first) before adding it to the flour with a teaspoon of sugar. After 10 minutes you should have some foam on the top if it’s active. You can then add it to the recipe. If you don’t get any bubbling, then there’s your answer.
There may be two other things going on here. 18 hours is a bit long, sometimes the yeast gets exhausted. So if it rose, and then deflated, that could be the reason. The second reason is what you suggested. Too much water will make it too wet and droopy. Check out the photos on the blog and try to make yours look the same. This is an area of nuance you may need to learn, but it only requires a little tweaking. A drop or two of water won’t make a difference, but if you’re mismeasuring by a 1/4 cup (either with flour or water) that could have an impact.
Please let me know if the changes helped. If you need further assistance please feel free to email me at astackofdishes@gmail.com I am MORE than happy to help. Once you get this down, you will LOVE it!
 KarenS says
April 17, 2015 at 12:10 amGail,
Thanks SO much! After a bit of a delay, I tried again with a few adjustments (a little less water, shorter rise time) and I’m getting better results — enough so that I’m feeling like I can do this. We’re going to continue to tweak and try variations, but now it’s more fun.
 Guy says
March 23, 2015 at 3:40 pmYup its the yeast. But you will not have had your dough rise though.
 Elyse says
April 4, 2015 at 9:43 amThanks so much for your attention to detail and thoroughness with this recipe. Ive made this recipe (and variations of) for several years now. However, I’m not sure what to do with my current batches- I have three doughs currently rising, prepared last night so they’re in the 12th hour of rising right now: plain, cranberry/orange and Gruyere/Rosemary/lemon. I am taking them to a luncheon tomorrow. Should I bake them at the 18-24 hour mark and let the bread sit overnight (just afraid it will get tough or stale) or bake them earlier tomorrow am, for a fresher bake, but longer 36 hour (and maybe not good?) rise time? In hindsight I realize I should have made the dough this morning for baking tomorrow but got ahead of myself! Thanks for any advice you have!
 Gail Watson says
April 10, 2015 at 4:37 pmI am SO sorry for my delayed response. I was with my family for Easter and just returned yesterday. I’m not sure how you solved your problem, but I hope it worked out. I love to get these questions, so it makes me so sad that I wasn’t able to answer this for you sooner. I hope your bread was a success, and thanks for the kind words. Best- Gail
 Neil says
April 15, 2015 at 10:34 pmCan you double up on the recipes?
 Gail Watson says
April 20, 2015 at 1:54 pmHi Neil- I do not. Because the dough is so wet and loose it’s easier to handle it as two batches. From a technical standpoint- yes, you may make a double batch and it will rise, etc. Let me know how it works out for you.
 Althea says
July 10, 2015 at 10:52 amI make this bread all the time and love it. I use the whey from the yogurt I make instead of water (which adds a ton of protein). I love it and have not brought a loaf of bread in just forever.
You might try making yogurt, you will love that
A
 Gail Watson says
August 8, 2015 at 6:06 amThat’s a wonderful idea Althea! Thanks for sharing that with me.
 Yosef says
February 8, 2016 at 7:39 pmThank you for sharing. I am now waiting to put the dough in the oven! I have tried other recipes and yours so far has come out exactly as you described it! Never knew bread baking was so much fun!
 Katherine says
March 8, 2016 at 12:36 pmIs it possible to bake the bread using a pizza stone instead of a dutch oven? I don’t have one and I have seen other artisan bread recipes that just use a preheated pizza stone in an oven.
-Katherine
 Gail Watson says
March 10, 2016 at 6:39 amHi Katherine- Yes it is but with a cost. The Dutch oven creates a steam chamber which creates the crunchy outside. You can work around this by spritzing the oven with some water and closing the oven. You can do this a few times during the baking to get a really crunchy crust. Yup, it works, it’s the method that is used to make crispy baguettes. This all said, I say keep an eye out at yard sales or thrift stores. You can pick up a dutch oven sometimes for real cheap. Let me know how it works out!
 Liz says
July 8, 2016 at 6:28 pmI used a pizza stone with a stainless steel pot inverted on top as a lid. Be careful when lifting the pot/lid since the heat rushes out and can burn you. The bread spread out a little and the pot went on the edge of the bread a bit. It didn’t look as good as it could but was tasty. Maybe baking two small loaves separately would fix that.
 L. Shep says
April 23, 2016 at 7:29 pmDo you think there is any reason this wouldn’t work with gluten free flour?
 Gail Watson says
April 24, 2016 at 4:57 amYou know, I’m not a gluten free expert. In general the gluten is the elastic that keeps the fibers together as the yeast produces gases and air bubbles. It probably would work fine, but my guess is that you might end up with a different texture. The knead free part, I guess would work. Give it a try! You can make a half batch. Then please write me back and let me know how you fared. I’m curious to know. Thanks so much for your question!
 Judy Bregante says
April 26, 2016 at 5:27 pmHI
I did everything you described. Dough rose nicely overnight, for about 16 plus hours.
When I went to shape it over parchment, I could not get it into a ball shape. Let it raise afte a few minutes of struggling with floured hand and board, but could not get it into a ball. It was a flat, roundish shape, still to sticky to work. I let it rest with plastic over it. And it stuck all over the plastic wrap and onto the parchment. With what dough was left, I worked it into a circlular shape, still extremely sticky.mi put a bowl over it because I did not want it to stick to plastic wrap again. I will be pitting it in the pot now. But doubt it will yield anything edible.
Thanks for any help you can give me for my next try.
Judy
Ps. Would this have happened if I inadvertendly used bread flour?
 Gail Watson says
April 26, 2016 at 5:39 pmHi Judy- The dough is very sticky and does not shape into a typical ball shape. You can see from the photos in the post that my dough is pretty flat. http://www.astackofdishes.com/the-famous-ny-times-no-knead-bread/ That said, yours might be too sticky. Next time follow the look of my photos. If it looks too loose or soupy feel free to add some more flour, but not to the density of a typical dough. When you are shaping the loaf feel free to use plenty of flour on your hands, board etc. Do not put plastic over the second rise. There is no need to. I hope this one gives you some sort of result you can enjoy. Please let me know how it goes. I’m here to help!
 Cindy says
May 29, 2016 at 3:54 pmFascinating conversation! All of it. Forgive me I did peruse the questions and did not see this addressed. MY goal IS fermentation and love the idea of using a starter rather than packaged yeast. Can this recipe be done using a starter and if so what would that look like. Thank you in advance.
Cindy
 Gail Watson says
August 3, 2016 at 5:28 amHi Sue- I am so sorry that I did not see this comment earlier! Please forgive me (hanging head).
The answer to your question about using a sourdough starter is yes. The thing to keep in mind is a wet dough and a long rise. I cannot give you any quantity guidelines, but I would go with a quarter of what you would normally use in a recipe and give it a go. Please let me know how it goes! Gail